After mastering the fundamentals — R multiples, account risk vs position risk, sizing based on edges — you’re ready for some upper level, more experienced techniques that will continue to separate your trading from everyone else.
What we’re going to cover today isn’t that complex — it just requires experience and emotional discipline (the foundation of proper position sizing anyways!).
If you’re still in Phase 1 or struggling with basic position sizing, stick to the fundamentals. What we’ll cover today won’t directly apply to you just yet.
Pyramiding Into Winners – The Minervini Method
The first advanced technique we’re going to cover is pyramiding into your winners. Pyramiding means adding to positions that are already profitable. This is the opposite of what most traders do (averaging down on losers). Here’s how you should approach pyramiding:
The Main Question: Should You Add To Your Positions?
The answer is yes — but it depends greatly on where you add to your positions. Adding at a random % gain, or because you feel like you don’t have enough on is a quick way to ruin your position and add way too much size.
So what should you do?
The 3-2-1 Pyramid Structure
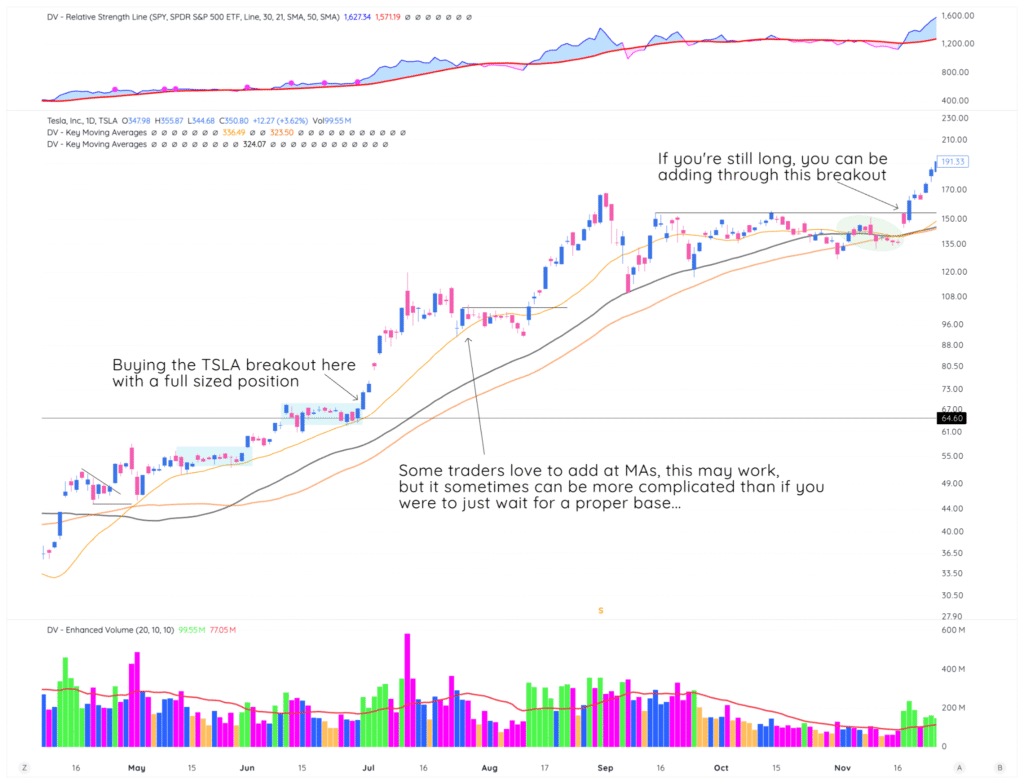
Everything starts with the chart. If the stock isn’t in a position where you would start your initial position, you should not be adding any size.
Here’s what we mean, visually:

If the stock is in a buyable position, here’s what you can do:.
- Initial Position: 100% of intended size (let’s say 15% total equity)
- First Add: ⅓ of the initial position size at a logical point (this would put you at 20% of the account total size)
- Second Add – if you’re lucky enough to hold onto something this long: Another ⅓-¼ of the original size (so ~5% equity add in our case)
This would take your total size to be 25% (+ gains that you’ve made) on the account, which is a sizable position and should pay you well if handled correctly.
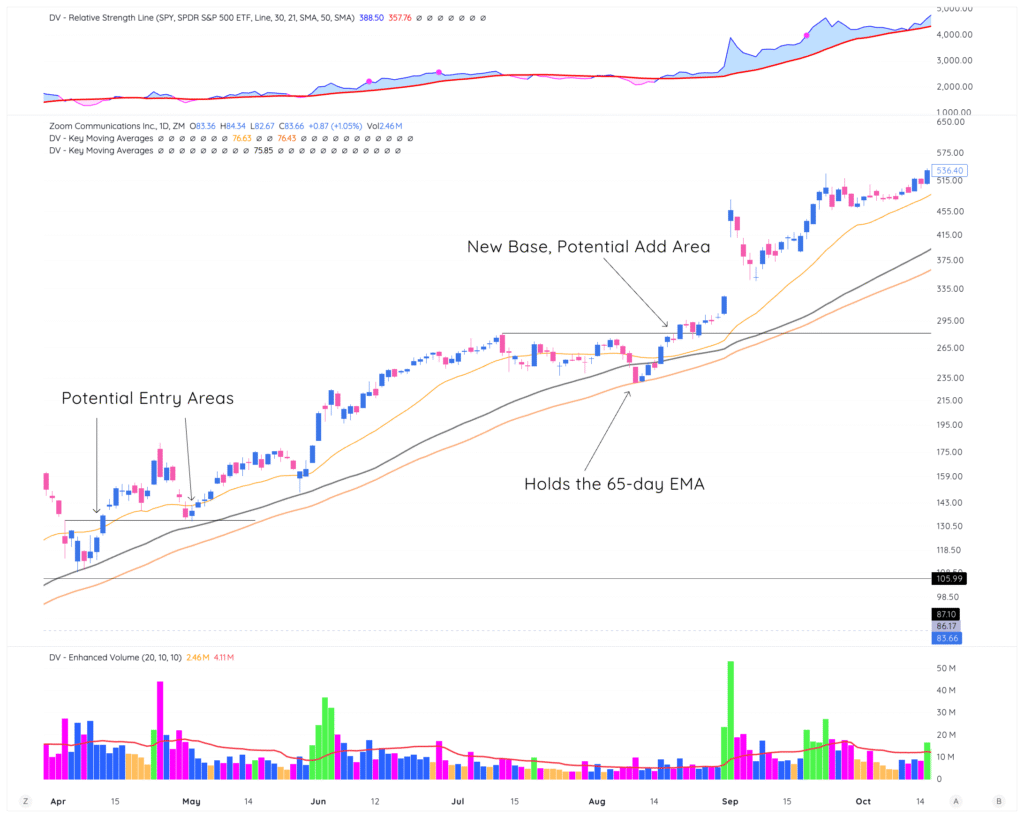
Another example with ZM from 2020:

Pyramiding Rules:
- Never pyramid into a losing position
- Each add should be smaller than the previous add
- Each add should be at a logical spot on the chart — not just where you “feel” like adding
- Only pyramid in confirmed uptrending markets
- Maintain logical stops on each piece of the position — handle them individually!
- Maximum 3 adds per position
The Selling Half Strategy
This technique protects profits while maintaining upside exposure. When a position reaches significant profit, you sell half and let the remainder run with a trailing stop.
Standard Selling Half Rules:
- Sell half at 20-25% profit (market-dependent)
- Move stop to above breakeven on remaining shares
- Let winners run with trailing stop methodology — this could be a moving average, a logical technical level on the charts…
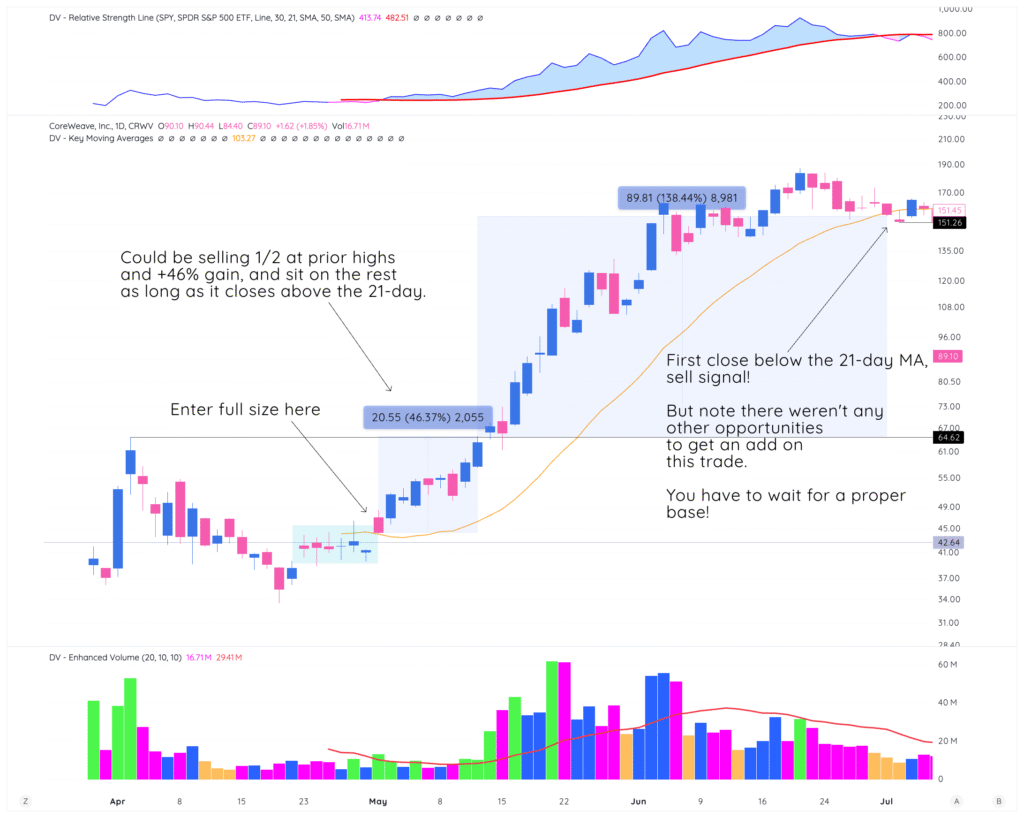
Check out this CRWV example:

Advanced Variation – The 1/3 Method:
- Sell 1/3 at 10-15% profit
- Sell 1/3 at 15-25% profit
- Let final 1/3 run until stopped out — using the trailing stop methodology
This locks in profits while maintaining exposure to potentially huge winners.
That’s one of the best parts about position sizing once you’ve established your profitability — you can determine the techniques you want to implement based on your personality and style.
Phase-Specific Applications:
- Phase 1: Sell half at 5-8% gain, keep it simple and let the other half either stop you out breakeven or on a close below a key moving average.
- Phase 2: Can use 1/3 method in strong markets
- Phase 3+: Full flexibility with custom selling strategies
Managing Correlation Risk
Correlation risk occurs when multiple positions move in the same direction simultaneously OR when specific stocks in your portfolio belong to the same group.
Let’s say coming into January of this year, you were holding semiconductor stocks like $AMD, $NVDA, and $AVGO.
And for simplicity’s sake, you had 10% of your account in each, so as a whole, you were 30% exposed to semiconductors. Then, on January 27th, the Deepseek AI news hits the markets and you wake up to see…
- NVDA down 16%
- AMD down 7%
- AVGO down 17%
As a whole, you’re down HUGE on the account because you’ve got pretty significant size oriented into one group.
To actively manage this risk — overnight news, bad regulatory rules, etc, the best traders ensure they keep sizing across the positions manageable.
What does this mean exactly?
When you’re concentrated in a certain sector or industry group, determine how much of your account you’d like to be exposed.
So instead of having 30% exposed across 3 different positions, you could:
- Reduce the individual sizes across the 3 positions to be total 20% exposed
- Or sell the lowest performing of the 3
In both of these scenarios, you’re reducing your exposure while still maintaining enough size to capture an outsized return if the groups move in your direction.
Portfolio Heat Management
Portfolio heat measures your total risk exposure across all positions. Advanced traders dynamically adjust this based on market conditions and personal performance.
Calculating Portfolio Heat:
Total Portfolio Heat = Sum of (Position Size × Stop Distance) for all positions
Example:
- Position A: 15% size, 5% stop distance = 0.75% heat
- Position B: 12% size, 4% stop distance = 0.48% heat
- Position C: 10% size, 6% stop distance = 0.60% heat
- Total Portfolio Heat: 1.83%
Dynamic Heat Management:
Strong Markets + Winning Streak: Allow up to 3-4% total heat
Neutral Markets: Maintain 2-2.5% total heat
Weak Markets + Losing Streak: Reduce to 1-1.5% total heat
And of course — you have to prepare for any black swan events like the Deepseek news we just covered above. Position sizing properly (confidently but not over-aggressively) allows you to capture major upside while still protecting the for the worst case scenario.
Position Sizing During Earnings Season
The last advanced technique we want to cover today is how you can position size during earnings season.
This is important for a couple of reasons:
- Surprise news/events happen often, and a downgrade or upgrade on projected earnings has the ability to make your year or ruin it. Hard to leave your sizing up to a binary even you have no control over!
- There are going to be sympathy plays as well, just like we covered with the semiconductor example above. If one name in your group reports terrible earnings, it’s possible you’ll face an overnight gap down even if your stock hasn’t reported.
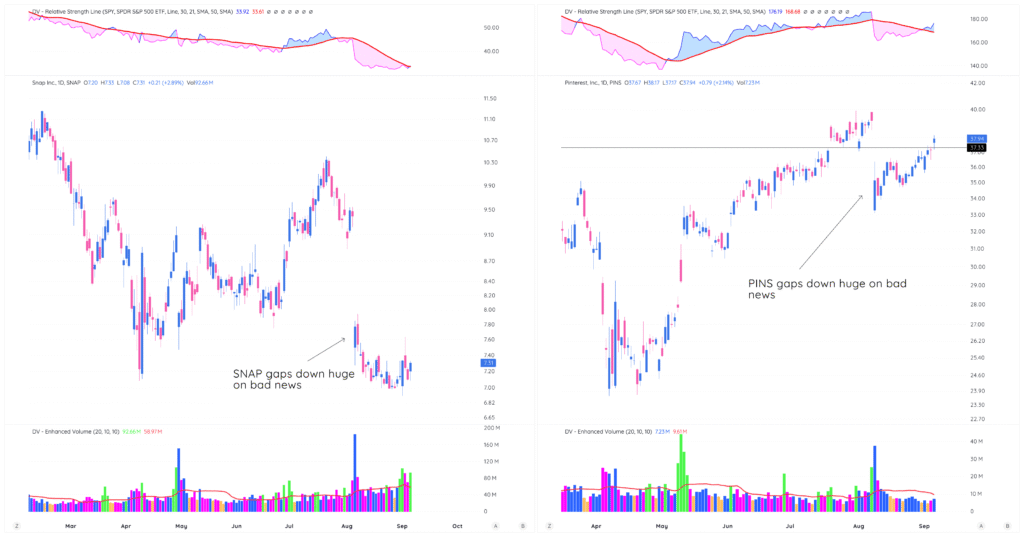
Just take this SNAP vs. PINS example:

No earnings reported, but bad news comes out and both stocks get smoked -17% and -10%.
You have to plan for both scenarios, and here’s how to do it:
Pre-Earnings Adjustments:
- Reduce positions by 25-50% before earnings if holding through
- Exit entirely if risk tolerance is low
- Only hold strong positions with significant profits ~ usually 2-3x the Implied Move
Post-Earnings Opportunities:
- Gap-up reactions: Can add to positions that gap favorably
- Gap-down reactions: Exit immediately if gap breaks key support
- Sideways reactions: Often leads to continued moves, maintain positions as long as the stock holds up
The key we want to go back to:
ALWAYS track your earnings dates, adjust sizes accordingly, and never hold a position that has no cushion through an EPS report — one of the easiest ways to blow your account and lose everything.
What’s Coming Next
The final lesson integrates everything into a personal position sizing system. You’ll learn how to combine all these techniques into a coherent approach that matches your trading style, risk tolerance, and experience level.
Building a system that works requires understanding how all these pieces fit together, not just collecting techniques.
Key Takeaways
Advanced techniques amplify your existing skills – both good and bad. Pyramiding adds to winners only, using decreasing position sizes. Selling half strategies lock in profits while maintaining upside exposure. Correlation risk must be managed through position size adjustments.
Portfolio heat management requires dynamic adjustment based on market conditions. Volatility-based sizing ensures consistent risk across different stocks. Advanced techniques require significant experience and emotional control.
Next Action: Choose one advanced technique that fits your current skill level. If you’re Phase 2, try selling half strategies. If you’re Phase 3+, experiment with portfolio heat management. Track results carefully and only expand to additional techniques after proving competency with each one individually.