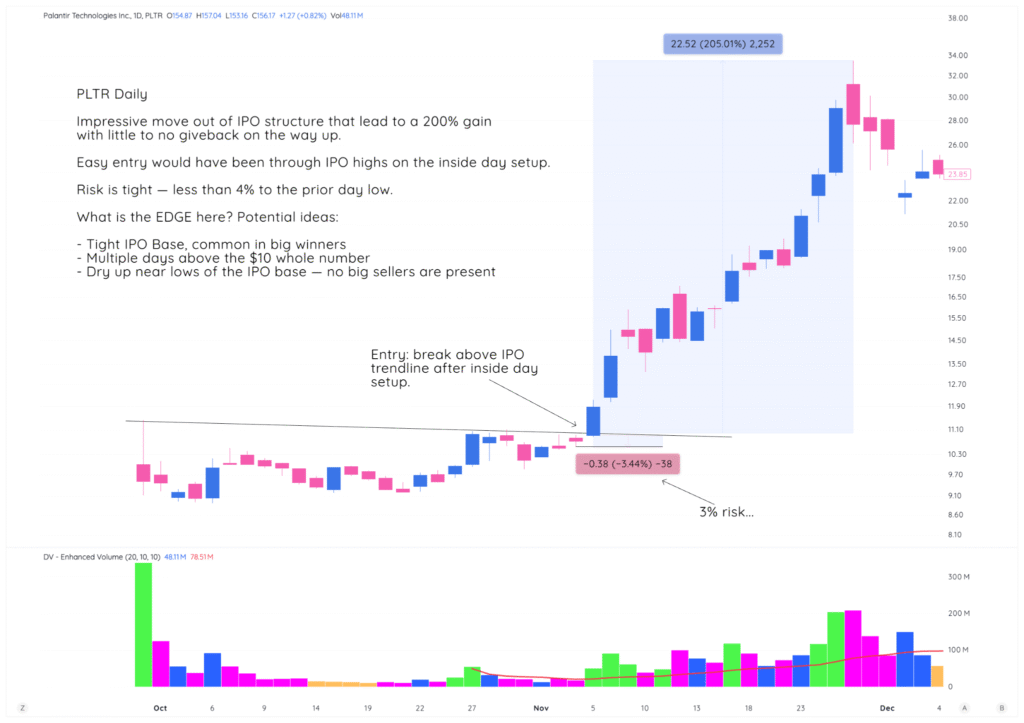
If you were to look at your last 100 trades, would you be able to tell someone the:
- Edge/strategy you’re implementing
- Where/why you entered where you did
- Where/why you exited where you did
We’ve seen too many traders study market historians (like the ones we’ve already covered in teh course — O’Neil, Darvas, Livermore, Minervini, etc) and think that they can immediately start trading exactly like them.
Then when a drawdown hits, and they start reviewing their trades, they can’t describe the thought process or the trade idea in the first place.
If this sounds like you — don’t worry, it’s incredibly common (and fixable). Before we get further into this “position sizing” mini course, you have to understand the ingredients that go into position sizing:
- Edge
- Entry tactics
- Exit tactics (stop losses or take profit orders)
Without these, you’re only a couple of trades away from becoming a boom-and-bust trader, and having no capital left.
By the end of today’s lesson, you’ll have completely avoided that mistake…
Let’s go:
Edges vs. Entry Tactics — What’s The Difference?
Let’s clear up the confusion: Edges & Entry Tactics may sound similar, but they’re different.
- Edges are the “why” behind a trade. They identify statistical advantages that give you higher probability of success over time. Think of edges as the reasons a setup is attractive or why you should be interested in the stock in the first place.
- In classic CANSLIM or TA, a chart pattern is an edge. You’ve seen this chart pattern lead to many high-flying moves throughout history, so when you do identify it, you’re ready to track it and wait for an entry.
- Entry Tactics are the “when and how” – they’re the specific triggers and execution methods for entering a position after you’ve identified edges. Here we’re focused on Risk:Reward, consistent execution, and self study. Your entry tactics are what lead to confident position sizing.
Checking back on our VCP course — the VCP pattern itself is an edge. You enter on a breakout.

Your risk:reward and number of edges at play (more on this in a second) determine your position sizing.
Edges: Statistical Advantages
From the TraderLion framework, edges include:
- High Volume Edges (HVE, HVIPO, HV1) – Massive volume spikes after an earnings report or news release that indicate huge institutional interest
- Relative Strength – Stock outperforming market during weakness
- N-Factor – Fundamental catalysts driving moves
- M-Factor – Market is uptrending and strong
- Technical Setup Quality – Clean base patterns, VCP characteristics
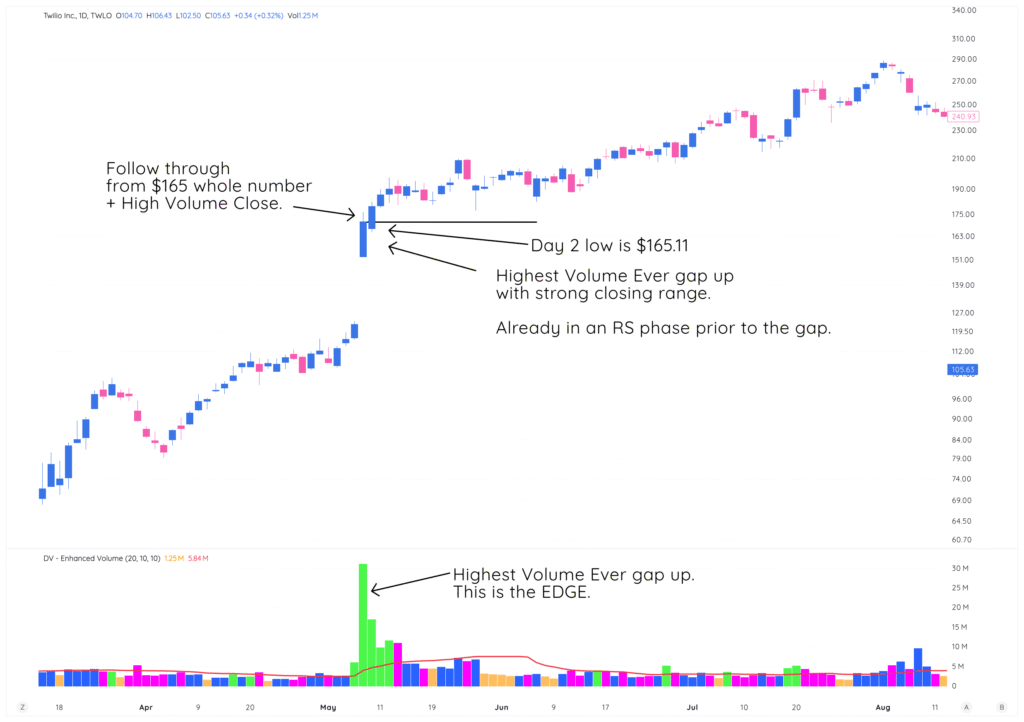
In the TWLO example below, the Highest Volume Ever gap up is the edge. This is the clue that institutions are interested and looking to accumulate.

Entry Tactics: Execution Timing
Entry tactics are the final layer after identifying edges. They include:
- Breakout triggers – Specific price levels that initiate entry
- Volume confirmation – Waiting for volume expansion on breakouts
- Intraday timing – First 30 minutes vs. last hour entries
- Pullback entries – Buying strength during minor pullbacks to support
Entry tactics answer: “Exactly when and at what price do I buy?”
Depending on your style, you could have used the $165 whole number as your entry tactic on the same TWLO example as shown above.

- You know what whole number you’re entering on (within 1-2%)
- You know where to set your stop loss (1-2% below the whole number)
And since it’s the strongest High Volume Edge, as well as already showing Relative Strength, you can size up confidently.
The Correct Order
Edge → Setup → Entry Tactic
- Edges signal opportunity and statistical advantage
- Setups combine multiple edges into recognizable patterns
- Entry tactics provide precise execution timing within the setup
You might identify 3 edges in a stock (high volume + relative strength + clean base), recognize it as a strong setup, but still need an entry tactic to determine whether you buy at the breakout level, on a pullback, or wait for volume confirmation.
Entries Come AFTER You Find Edges
This is backwards for most people. They see a stock moving and immediately think “how do I get in?”
Wrong approach.
The right sequence:
- First: Identify your edges (why should this stock move?)
- Second: Wait for your entry trigger (exactly when do you buy?)
- Third: Calculate position size based on edges + risk
Your entry tactic has to be repeatable. “It looked good” isn’t a system. “Breakout above $165 whole number with volume confirmation” is a system.
The risk/reward from your entry tactic helps determine your sizing – we’ll cover the exact math in the Van Tharp lesson next.
Stop Losses: Chart Logic, Not Random Numbers
Your stop loss placement determines everything about position sizing. Get this wrong and the whole system falls apart.
Critical rule: Stops go where the chart tells you, not where your calculator wants them.
Good stop placement:
- Below the most recent swing low
- Under the low of your entry day
- Below a key whole number (like $160 if you entered at $165)
- Under VWAP or a major moving average
- Below the pattern low that created your setup
Bad stop placement:
- “I want to risk exactly 3% so I’ll put my stop there”
- “The book says 5% stops, so that’s where mine goes”
- Random percentages that ignore what the chart is actually showing
The chart doesn’t care about your risk percentage. It only respects actual support and resistance levels.
This course won’t teach you every stop loss method – that’s a whole different topic. But you need to understand that logical chart-based stops are mandatory before any position sizing system will work.
Why This Matters for Position Sizing
Position sizing is simple math once you have these pieces:
- Account risk (1% of $50,000 = $500)
- Per-share risk (entry at $50, stop at $47 = $3 per share)
- Position size ($500 ÷ $3 = 167 shares)
But if your stop is arbitrary or your entry is random, the math becomes meaningless.
Two Different Sizing Techniques
Now that you have a baseline understanding of the difference between edges, setups, entry tactics, and why setting logical stops is so key to sizing, we can move on to the two different types of position sizing techniques.
Idea #1: Sizing Based On Risk
We’re going to cover the ins and outs of this in the next lesson. Still, in this method, your position size is directly related to the entry and exit you’ve determined, as well as how much you’ve determined you’re willing to risk as a percentage or dollar value on the account.

We’ll walk through this exact setup in the next lesson, but it’s worth your time to review the commentary on the chart.
- What are the edges that are present?
- What’s the setup?
- What’s the entry tactic?
- Where do you set a logical stop loss?
All of these answers lead you to the type of size you should have on the trade.
Idea #2: Sizing Based On Edges
There’s another way to position size — and it’s this:
The number of edges you stack determines your position size.
More edges = more conviction = bigger position.
In the TWLO example:
- High Volume Edge (HVE gap-up)
- Relative Strength Edge (already outperforming before the gap)
- Technical Setup Edge (clean breakout pattern)
Three solid edges = you can size up confidently. One weak edge = smaller position or pass entirely.
We’ll dive deep into this edge-based scaling system in the Webster lesson later in the course. For now, just understand the concept: edge count drives position size in method #2.
Next up: Sizing Based On Risk with Van Tharp
We’re diving into Van Tharp’s mathematical foundation that shows precisely how small accounts become large accounts through proper position sizing. No more guessing about whether your risk percentages actually make sense.